ページの作成
親となるページを選択してください。

親ページに紐づくページを子ページといいます。
例: 親=スポーツ, 子1=サッカー, 子2=野球
子ページを親ページとして更に子ページを作成することも可能です。
例: 親=サッカー, 子=サッカーのルール
親ページはいつでも変更することが可能なのでとりあえず作ってみましょう!
| この記事の要点 |
|
SwiftUI で地図を表示
iOS 14 から MapKit モジュールが SwiftUI 対応。iOS 17 で大幅にリニューアルされ、宣言的な記述が更にスッキリしました。
1. 最小例 (iOS 14-16)
import SwiftUI
import MapKit

struct ContentView: View {
    @State private var region = MKCoordinateRegion(
        center: CLLocationCoordinate2D(latitude: 35.6586, longitude: 139.7454),  // 東京タワー
        span: MKCoordinateSpan(latitudeDelta: 0.05, longitudeDelta: 0.05)
    )

    var body: some View {
        Map(coordinateRegion: $region)
            .ignoresSafeArea()
    }
}
2. iOS 17+ の新 API
import SwiftUI
import MapKit

struct ContentView: View {
    @State private var position: MapCameraPosition = .region(
        MKCoordinateRegion(
            center: CLLocationCoordinate2D(latitude: 35.6586, longitude: 139.7454),
            span: MKCoordinateSpan(latitudeDelta: 0.05, longitudeDelta: 0.05)
        )
    )

    var body: some View {
        Map(position: $position) {
            Marker("東京タワー", coordinate: .init(latitude: 35.6586, longitude: 139.7454))
                .tint(.red)

            Marker("スカイツリー", systemImage: "antenna.radiowaves.left.and.right",
                   coordinate: .init(latitude: 35.7101, longitude: 139.8107))
                .tint(.blue)

            Annotation("カスタム", coordinate: .init(latitude: 35.681, longitude: 139.767)) {
                VStack {
                    Image(systemName: "star.fill")
                        .foregroundStyle(.yellow)
                    Text("東京駅")
                        .font(.caption)
                }
                .padding(6)
                .background(.white)
                .clipShape(Capsule())
            }
        }
        .mapStyle(.standard(elevation: .realistic))  // .standard / .hybrid / .imagery
        .mapControls {
            MapUserLocationButton()
            MapCompass()
            MapScaleView()
        }
        .ignoresSafeArea()
    }
}
3. mapStyle (地図の種類)
| スタイル | 説明 |
|---|---|
.standard | 標準地図 |
.standard(elevation: .realistic) | 3D 標高表示 |
.hybrid | 衛星写真 + 道路名 |
.imagery | 衛星写真のみ |
4. 現在地表示 (位置情報許可)
Info.plist 設定 (必須)
<!-- Info.plist -->
<key>NSLocationWhenInUseUsageDescription</key>
<string>現在地周辺の店舗を表示するために位置情報を使用します</string>

<!-- バックグラウンドでも使う場合 -->
<key>NSLocationAlwaysAndWhenInUseUsageDescription</key>
<string>バックグラウンドでも位置追跡を行います</string>
CLLocationManager で許可リクエスト
import CoreLocation
import Combine

final class LocationManager: NSObject, ObservableObject, CLLocationManagerDelegate {
    private let manager = CLLocationManager()
    @Published var location: CLLocation?
    @Published var status: CLAuthorizationStatus = .notDetermined

    override init() {
        super.init()
        manager.delegate = self
        manager.desiredAccuracy = kCLLocationAccuracyBest
    }

    func requestAuthorization() {
        manager.requestWhenInUseAuthorization()
    }

    func startUpdating() {
        manager.startUpdatingLocation()
    }

    // MARK: - Delegate
    func locationManager(_ manager: CLLocationManager,
                         didChangeAuthorization status: CLAuthorizationStatus) {
        self.status = status
        if status == .authorizedWhenInUse || status == .authorizedAlways {
            manager.startUpdatingLocation()
        }
    }

    func locationManager(_ manager: CLLocationManager,
                         didUpdateLocations locations: [CLLocation]) {
        self.location = locations.last
    }
}
struct ContentView: View {
@StateObject private var lm = LocationManager()
@State private var position: MapCameraPosition = .userLocation(fallback: .automatic)
var body: some View {
Map(position: $position) {
UserAnnotation() // 現在地のドット
}
.mapControls {
MapUserLocationButton() // 現在地ボタン
}
.onAppear {
lm.requestAuthorization()
}
}
}5. ピンタップでアクション
struct Shop: Identifiable {
    let id = UUID()
    let name: String
    let coordinate: CLLocationCoordinate2D
}

struct ContentView: View {
    @State private var selected: Shop?

    let shops = [
        Shop(name: "東京駅", coordinate: .init(latitude: 35.681, longitude: 139.767)),
        Shop(name: "渋谷",   coordinate: .init(latitude: 35.659, longitude: 139.700)),
    ]

    var body: some View {
        Map(selection: $selected) {
            ForEach(shops) { shop in
                Marker(shop.name, coordinate: shop.coordinate)
                    .tag(shop)
            }
        }
        .sheet(item: $selected) { shop in
            ShopDetailView(shop: shop)
        }
    }
}
6. 検索 (MKLocalSearch)
import MapKit

func search(text: String) async throws -> [MKMapItem] {
    let request = MKLocalSearch.Request()
    request.naturalLanguageQuery = text
    request.region = MKCoordinateRegion(
        center: CLLocationCoordinate2D(latitude: 35.68, longitude: 139.76),
        span: MKCoordinateSpan(latitudeDelta: 0.1, longitudeDelta: 0.1)
    )
    let search = MKLocalSearch(request: request)
    let response = try await search.start()
    return response.mapItems
}

// 利用
Task {
    let items = try await search(text: "ラーメン")
    for item in items {
        print(item.name ?? "", item.placemark.coordinate)
    }
}
7. ルート描画 (MKDirections)
import MapKit
func calculateRoute(from: CLLocationCoordinate2D,
to: CLLocationCoordinate2D) async throws -> MKRoute? {
let request = MKDirections.Request()
request.source = MKMapItem(placemark: MKPlacemark(coordinate: from))
request.destination = MKMapItem(placemark: MKPlacemark(coordinate: to))
request.transportType = .automobile // .walking / .transit / .automobile
let directions = MKDirections(request: request)
let response = try await directions.calculate()
return response.routes.first
}
// SwiftUI で描画 (iOS 17+)
struct RouteMap: View {
@State private var route: MKRoute?
var body: some View {
Map {
if let route {
MapPolyline(route.polyline)
.stroke(.blue, lineWidth: 5)
}
}
.task {
route = try? await calculateRoute(
from: .init(latitude: 35.681, longitude: 139.767),
to: .init(latitude: 35.659, longitude: 139.700)
)
}
}
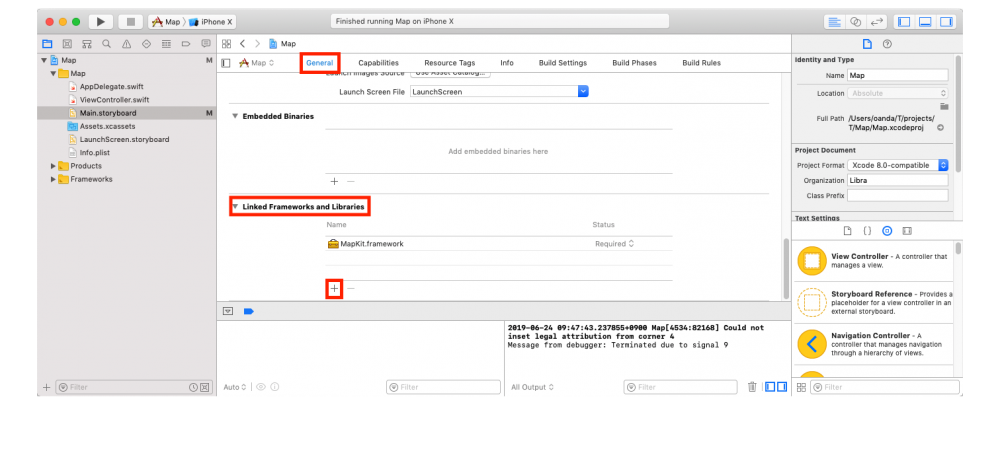
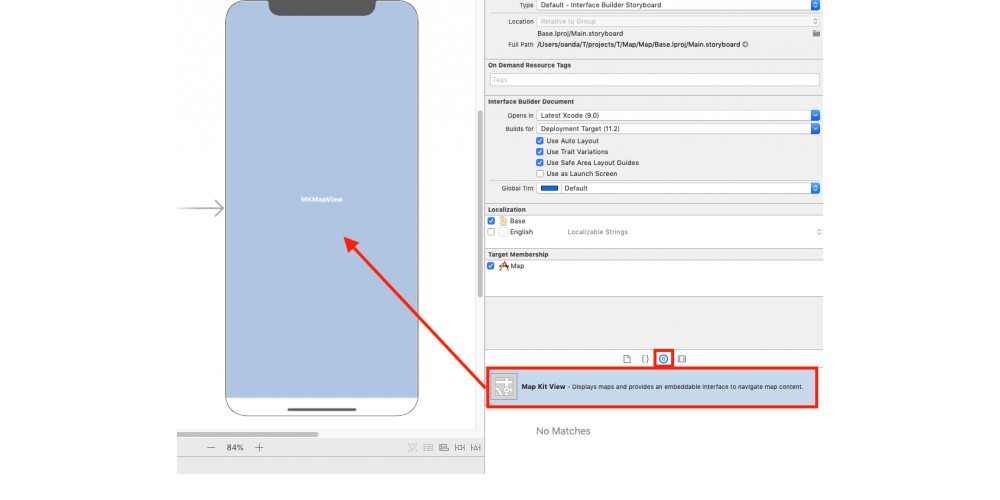
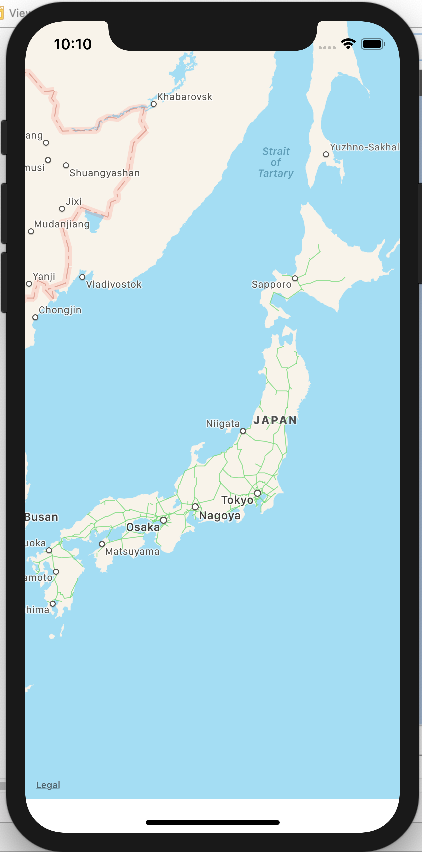
}UIKit (MKMapView) での実装
import UIKit
import MapKit

class MapViewController: UIViewController, MKMapViewDelegate {
    let mapView = MKMapView()

    override func viewDidLoad() {
        super.viewDidLoad()
        mapView.frame = view.bounds
        mapView.autoresizingMask = [.flexibleWidth, .flexibleHeight]
        mapView.delegate = self
        mapView.showsUserLocation = true
        view.addSubview(mapView)

        // 中心
        let center = CLLocationCoordinate2D(latitude: 35.6586, longitude: 139.7454)
        let region = MKCoordinateRegion(center: center,
                                        latitudinalMeters: 1000,
                                        longitudinalMeters: 1000)
        mapView.setRegion(region, animated: true)

        // ピン追加
        let pin = MKPointAnnotation()
        pin.coordinate = center
        pin.title = "東京タワー"
        mapView.addAnnotation(pin)
    }

    // カスタムアノテーション
    func mapView(_ mapView: MKMapView,
                 viewFor annotation: MKAnnotation) -> MKAnnotationView? {
        guard !(annotation is MKUserLocation) else { return nil }
        let id = "pin"
        let view = mapView.dequeueReusableAnnotationView(withIdentifier: id)
            ?? MKMarkerAnnotationView(annotation: annotation, reuseIdentifier: id)
        view.canShowCallout = true
        (view as? MKMarkerAnnotationView)?.glyphImage = UIImage(systemName: "star.fill")
        (view as? MKMarkerAnnotationView)?.markerTintColor = .systemRed
        return view
    }
}
パフォーマンス・運用 Tips
- 大量のピン (>500) はクラスタリング (
clusteringIdentifier) で集約 - カメラ移動が頻繁なら
onMapCameraChangeで debounce - Apple Maps の API は無料 (App Store 配布アプリ)。Google Maps SDK は登録 + 課金
- Look Around は
MKLookAroundViewController(iOS 16+) - 3D 建物は
showsBuildings = true
FAQ
Q: 地図が真っ青で表示されない
A: シミュレータの位置設定 (Features → Location) を確認。実機なら Wi-Fi 接続を確認。
Q: 現在地ピンが動かない
A: シミュレータは Features → Location → Custom Location で座標入力 or City Run などのプリセット利用。
Q: 中国本土で表示がズレる
A: 中国は GCJ-02 座標系のため WGS-84 とズレが生じる。Apple Maps は自動補正されますが、サードパーティ座標を流すと不整合。
Q: オフラインで地図を見たい
A: Apple Maps は標準でオフライン対応 (iOS 17+)。事前に範囲をダウンロード可能。
📸 参考画像
※ 旧バージョンから引き継いだ参考画像です。手順・図解の補助としてご覧ください。
ページの作成
親となるページを選択してください。
親ページに紐づくページを子ページといいます。
例: 親=スポーツ, 子1=サッカー, 子2=野球
子ページを親ページとして更に子ページを作成することも可能です。
例: 親=サッカー, 子=サッカーのルール
親ページはいつでも変更することが可能なのでとりあえず作ってみましょう!
子ページ
子ページはありません
人気ページ
- 1 Eclipseで「サーバーに追加または除去できるリソースがありません。」の原因と対処法
- 2 tomcat の起動 / 停止ログと catalina.log・catalina.out の違い
- 3 JavaScript base URL 取得方法|window.location.origin と SSR/Node.js 対応
- 4 YouTube Data API v3 エラー一覧|403/400/404 の主要原因と切り分け
- 5 Spring Frameworkのアノテーション一覧
- 6 Laravel エラー一覧|500/Blade/DB 接続/ルーティングの代表エラー
- 7 3Dグラフィックスとは|モデリング/レンダリング/主要ソフトウェア (Blender / Maya)
- 8 【Spring】@Valueアノテーションとは
- 9 CATALINA_HOME の確認方法 (Linux / Mac)
- 10 【Spring】@Autowiredアノテーションとは
最近更新/作成されたページ
- IPv6とは|128bitアドレス・コロン16進表記/::省略・リンクローカル・SLAAC・デュアルスタック 2026-06-22 12:34:44
- MAC アドレスフィルタリングの仕組みと限界 | ネットワーク入門 2026-06-22 12:19:10
- VPNとは|暗号トンネル・サイト間/リモートアクセス・IPsec/SSL-VPN/WireGuardを解説 2026-06-22 12:19:10
- HTTP/2 とは 多重化・HPACK・バイナリフレーム | ネットワーク入門 2026-06-22 12:17:25
- gRPC とは HTTP/2 + Protocol Buffers の高速 RPC | ネットワーク入門 2026-06-22 12:17:25
- WebSocket とは 全二重リアルタイム通信 ws/wss | ネットワーク入門 2026-06-22 12:17:25
- WebRTC とは ブラウザ間 P2P の音声・映像・データ通信 | ネットワーク入門 2026-06-22 12:17:25
- HTTP/3 (QUIC) とは UDP ベースの低遅延 Web 通信 | ネットワーク入門 2026-06-22 12:17:25
- Web通信プロトコル入門 HTTP/2・HTTP/3・WebSocket・gRPC・WebRTC | ネットワーク入門 2026-06-22 12:17:25
- HAProxy とは frontend/backend と設定例 | ネットワーク入門 2026-06-22 12:17:24
- iptables/nftablesとは|テーブル・チェーン・ルール例・永続化をLinux視点で解説 2026-06-22 12:17:24
- CDN とは エッジキャッシュ・TTL・Cloudflare/CloudFront | ネットワーク入門 2026-06-22 12:17:24
- TLS/SSLの仕組み|ハンドシェイク・暗号スイート・前方秘匿性・証明書検証をわかりやすく解説 2026-06-22 12:17:24
- ファイアウォールとは|パケットフィルタ・ステートフル・DMZ・次世代FW(L4/L7)を解説 2026-06-22 12:17:24
- 証明書と認証局(CA)とは|X.509・信頼チェーン・DV/OV/EV・失効(CRL/OCSP)を解説 2026-06-22 12:17:24
コメントを削除してもよろしいでしょうか?