タイトル: 導入方法と基本動作
本稿はThymeleafの導入方法と基本動作について説明します。
Mavenへの記述
pom.xmlに以下の記述をしてインストールします。
|
<dependency> <groupId>org.springframework.boot</groupId> <artifactId>spring-boot-starter-thymeleaf</artifactId> </dependency> |
テンプレートファイルの設置
以下のディレクトリにテンプレートファイルを作成します。
|
/src/main/resources/templates/index.html |
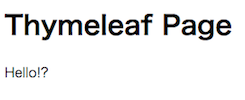
index.htmlの内容は以下の通りです。
|
<!DOCTYPE html> <html xmlns:th="http://www.thymeleaf.org"> <head> <meta charset="UTF-8"> <title>Thymeleaf Page</title> </head> <body> <h1>Thymeleaf Page</h1> <p th:text="${message}"></p> </body> </html> |
コントローラーの作成
以下を参考にコントローラーを作成します。
|
@Controller public class TestController {
@RequestMapping("/") public String index(Model model) { String message = "Hello!?"; model.addAttribute("message", message); return "index"; } } |
出力結果