タイトル: メールの環境設定
SEOタイトル: Postfix メールサーバ設定完全ガイド
| この記事の要点 |
|
Postfix とは
Postfix は Wietse Venema が IBM で開発した MTA (Mail Transfer Agent) で、Sendmail 互換ながらセキュア・高速・モジュール構造を特徴とします。Ubuntu/Debian/RHEL いずれでも標準採用され、世界で最も普及した SMTP サーバです。
主要ファイルとディレクトリ
| パス | 役割 |
|---|---|
/etc/postfix/main.cf | 本体の設定(ホスト名・受信ドメイン・リレー等) |
/etc/postfix/master.cf | 各サービス(smtp/smtps/submission)の起動定義 |
/etc/aliases | ローカル別名(root → admin@example.com 等) |
/var/spool/postfix/ | 送受信キュー (active/deferred/incoming) |
/var/log/mail.log | ログ(RHEL 系は /var/log/maillog) |
main.cf の必須パラメータ
# /etc/postfix/main.cf

# このサーバの完全修飾ホスト名
myhostname = mail.example.com

# このサーバが属するドメイン
mydomain = example.com

# 送信元アドレスのドメイン (省略時 myhostname)
myorigin = $mydomain

# 自サーバ宛と扱うドメイン (= 受信して保存)
mydestination = $myhostname, localhost.$mydomain, localhost, $mydomain

# 受信を許可するネットワーク
mynetworks = 127.0.0.0/8 [::1]/128 10.0.0.0/8

# どのインターフェースで待ち受けるか
inet_interfaces = all
inet_protocols = ipv4

# リレー先 (空 = 自分で配送、指定 = そこへ転送)
relayhost = [smtp.gmail.com]:587

# メールボックス形式
home_mailbox = Maildir/
master.cf: サービスポート定義
SMTP (25)、Submission (587)、SMTPS (465) などのサービスを定義します:
# /etc/postfix/master.cf

# 25: メール送受信 (MTA 間)
smtp      inet  n       -       y       -       -       smtpd

# 587: Submission (クライアント送信 + STARTTLS)
submission inet n       -       y       -       -       smtpd
  -o syslog_name=postfix/submission
  -o smtpd_tls_security_level=encrypt
  -o smtpd_sasl_auth_enable=yes
  -o smtpd_reject_unlisted_recipient=no
  -o smtpd_client_restrictions=permit_sasl_authenticated,reject

# 465: SMTPS (旧)
smtps     inet  n       -       y       -       -       smtpd
  -o syslog_name=postfix/smtps
  -o smtpd_tls_wrappermode=yes
  -o smtpd_sasl_auth_enable=yes
SMTP 認証 (SASL)
ユーザ名 + パスワードで送信可能にする場合、SASL を有効化します。Dovecot 連携が一般的:
# main.cf に追加
smtpd_sasl_type = dovecot
smtpd_sasl_path = private/auth
smtpd_sasl_auth_enable = yes
smtpd_sasl_security_options = noanonymous
smtpd_sasl_local_domain = $myhostname

# 認証済のクライアントだけ送信許可
smtpd_relay_restrictions =
    permit_sasl_authenticated,
    permit_mynetworks,
    reject_unauth_destination
TLS / STARTTLS の有効化
# 受信側 (smtpd) TLS
smtpd_tls_cert_file = /etc/letsencrypt/live/mail.example.com/fullchain.pem
smtpd_tls_key_file  = /etc/letsencrypt/live/mail.example.com/privkey.pem
smtpd_tls_security_level = may         # opportunistic
smtpd_tls_loglevel = 1

# 送信側 (smtp) TLS
smtp_tls_security_level = may
smtp_tls_CAfile = /etc/ssl/certs/ca-certificates.crt
SPF / DKIM / DMARC
現代のメール配信は SPF/DKIM/DMARC 三点セットが事実上の必須です。これらが無いと Gmail / Outlook で迷惑メール扱いまたは拒否されます。
| 仕組み | 設定先 | 概要 |
|---|---|---|
| SPF | DNS TXT | 送信を許可する IP を宣言v=spf1 mx ~all |
| DKIM | OpenDKIM + DNS TXT | 送信メールに電子署名・公開鍵を DNS 公開 |
| DMARC | DNS TXT | SPF/DKIM 不合格時のポリシーv=DMARC1; p=quarantine; rua=mailto:... |
# OpenDKIM インストール (Ubuntu)
sudo apt install -y opendkim opendkim-tools

# 鍵生成
sudo opendkim-genkey -s default -d example.com
# default.private (秘密鍵) と default.txt (DNS 公開用) ができる

# DNS に登録 (default._domainkey TXT)
cat default.txt

# Postfix と連携
echo "milter_default_action = accept" >> /etc/postfix/main.cf
echo "smtpd_milters = inet:localhost:8891" >> /etc/postfix/main.cf
echo "non_smtpd_milters = inet:localhost:8891" >> /etc/postfix/main.cf
運用コマンド
# 設定検証
sudo postfix check

# 設定再読込 (無停止)
sudo postfix reload

# 再起動
sudo systemctl restart postfix

# 状態
sudo systemctl status postfix

# 現在の有効設定一覧
postconf -n            # 既定から変更したもののみ
postconf | head

# 個別パラメータ確認/変更
postconf myhostname
sudo postconf -e "myhostname=mail.example.com"

# キュー確認
postqueue -p
mailq                  # 同じ

# 全キュー削除
sudo postsuper -d ALL

# 特定 ID を削除
sudo postsuper -d ABCD1234

# 全キューを再配送試行
sudo postqueue -f
ログの読み方
# /var/log/mail.log を tail
sudo tail -f /var/log/mail.log

# 主なログ要素
Jun 10 12:00:01 mail postfix/smtpd[1234]: connect from client[1.2.3.4]
Jun 10 12:00:02 mail postfix/cleanup[1235]: ABCD1234: message-id=<...>
Jun 10 12:00:03 mail postfix/qmgr[1100]: ABCD1234: from=<a@b>, size=1234, nrcpt=1
Jun 10 12:00:04 mail postfix/smtp[1236]: ABCD1234: to=<c@d>, relay=..., delay=1, status=sent (250 OK)

# status の意味
sent      送信成功
deferred  一時失敗 (再試行)
bounced   恒久失敗 (NDR 返却)
reject    受信拒否
Gmail SMTP リレー設定 (送信専用サーバ)
サーバから通知メールを送るだけなら、自前 MTA で 25 番に直接送信せず、Gmail / SES / SendGrid 等にリレーするのが現実的です。クラウドの 25 番送信は塞がれているのが普通。
# /etc/postfix/main.cf に追記
relayhost = [smtp.gmail.com]:587
smtp_sasl_auth_enable = yes
smtp_sasl_password_maps = hash:/etc/postfix/sasl_passwd
smtp_sasl_security_options = noanonymous
smtp_tls_security_level = encrypt
smtp_tls_CAfile = /etc/ssl/certs/ca-certificates.crt
# 認証情報ファイル
sudo tee /etc/postfix/sasl_passwd <<EOF
[smtp.gmail.com]:587 myuser@gmail.com:app-password
EOF
# ハッシュ DB 化
sudo postmap /etc/postfix/sasl_passwd
sudo chmod 600 /etc/postfix/sasl_passwd /etc/postfix/sasl_passwd.db
# 反映
sudo postfix reload
# 送信テスト
echo "test body" | mail -s "Test from Postfix" you@example.comPostfix vs Sendmail vs Exim
| MTA | 長所 | 短所 |
|---|---|---|
| Postfix | セキュア・モジュール・速い・設定簡潔 | — |
| Sendmail | 歴史的標準・互換性 | 設定 (sendmail.cf) が難解・脆弱性履歴 |
| Exim | 柔軟な ACL・Debian/cPanel で人気 | 大規模で設定肥大 |
FAQ
Q: 設定変更後にメールが届かない
A: ① postfix check → ② tail -f /var/log/mail.log → ③ postqueue -p でキュー詰まり確認。多くは DNS / TLS / SASL のいずれか。
Q: 25 番ポートが繋がらない
A: AWS/GCP/Azure はアウトバウンド 25 番が既定で塞がれています。Submission (587) でリレーホスト経由が現実解。
Q: メールが Gmail で「迷惑メール」になる
A: 高確率で SPF/DKIM/DMARC 未設定または逆引き未設定。mail-tester.com でスコア確認を推奨。
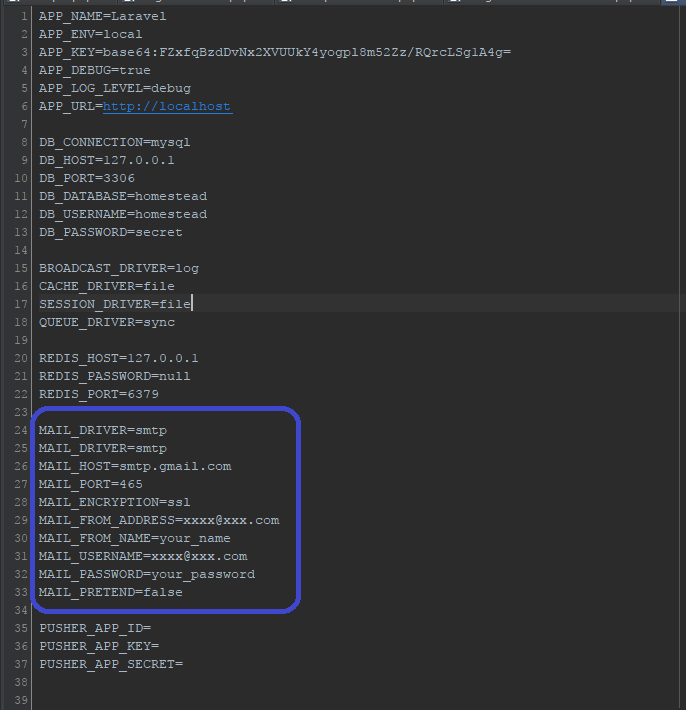
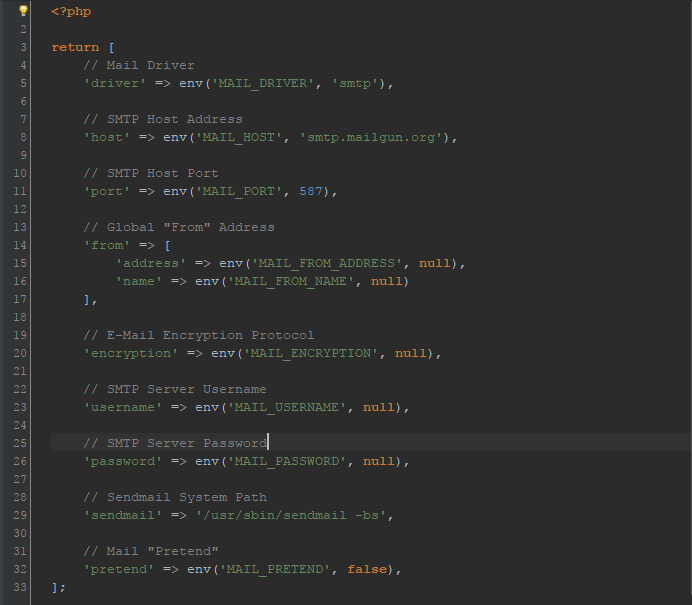
📸 参考画像
※ 旧バージョンから引き継いだ参考画像です。手順・図解の補助としてご覧ください。